

NN Menu
A GreenWaves’ GitHub repository that helps you to build and test your application
In this tutorial, we discuss the NN Menu – a GreenWaves’ repository that includes NN examples and benchmarks of well-known architectures that help you to build your application and run it on the GAP processor.
Please go to the GreenWaves’ GitHub page. The NN Menu link loads the README file. Here you can see three main directories:
• The first directory is called ingredients; it contains common mobile and edge NN architectures examples. This is a good starting point to see how network topologies are mapped onto GAP and view their performance.
• The second directory is called starters; it contains application examples with specific datasets that you can test on our development board and see the NN running for a specific task.
• The third directory is called main courses; it contains full-flagged applications. Each application targets its own specifically designed board.

Let’s start with the ingredients and see how your neural network will run on GAP. It’s quite an easy and intuitive process. First, I simply copy this code into my Linux shell:
git clone --recurse-submodules -j4 git@github.com:GreenWaves-Technologies/nn_menu.git
This installs the main repository and all the subrepositories. I also need to download our latest SDK from our GitHub site by clicking on gap_sdk and following the READ.ME instructions.
Once the SDK is installed, I can come back to my NN Menu to continue with the “Ingredients” repository and source the sdk sourceme.sh
Now I can choose which board I would like to target. In our case, we choose GAPuino-V3, which is the latest general-purpose development board. After I select a board, I go into ingredients and pick, for example, image classification networks, which contains the mobile net family of the neural networks.


If you go back to the GitHub repository and click on ingredients, you can see the whole list of supported networks and information about the size of the network, accuracy, and frames per second (FPS) on the GAP8 processor.
For this tutorial, we choose a predefined network: MobileNet V1 224 1.0. This is the biggest one that I would like to run on our SoC simulator GVSOC.
We go back to our shell and type:
make clean all run platform=gvsoc
This will load the TFLight and NNTool– a GreenWaves tool that takes a high-level NN description from TFLite and translates all the layers and parameters to an AutoTiler model description. This will be used later by our key tool AutoTiler to generate parallelized convolutional kernels to run on GAP.
We see that the code is starting to run on the GAP simulator GVSOC and you can see the performance of each network layer in terms of operations per cycle. At the bottom, you can see the total number of cycles, operations, and operations per cycle.
The process is absolutely the same if you want to use MobileNet_V1 Pytorch or KWS – keywords spotting, which is a Google Network.

Now let’s talk about starters – these networks are trained for a specific task and can be used with several options. For example, you can run them on the GAPuino development board and use them with your own dataset images or with wave files sourced from your PC or you can collect them with a camera or you can use it with a microphone.
For this tutorial, I will test this network with a real image and will run it on our GVSOC simulator.

In my shell I type:
make clean all run platform=gvsoc
We see the same process I described earlier with TFLight converted to the Autotiler Model, and, in our case, we use our images to do 16 bits quantization. Here we see that the code is compiling with the RISC-V GCC compiler and after it will be run on the GVSOC simulator.
Here, you can see a sample of the image we loaded.

Let’s copy this code and go back to our Sublime text editor in DrawBB.py and paste it here, removing the default code.
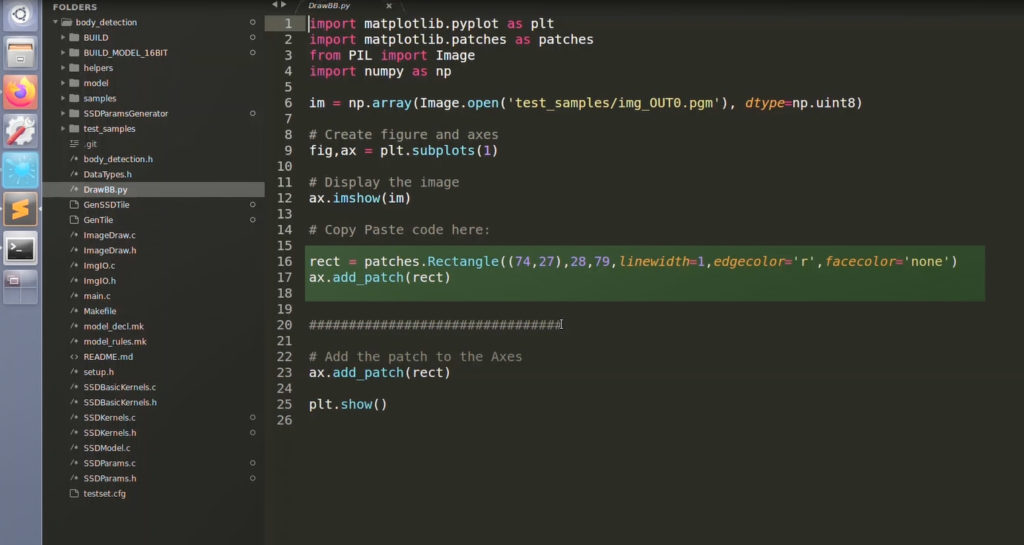
Now let’s run it on the Linux shell by typing:
Python DrawBB.py
We can see the detected bounding box that is printed here with the score, coordinates, width, and height of the image.

Now let’s explore the last directory – Main courses – our full flagged applications. The neural network is trained for a specific use case and targets a specific board. For Face ID it is GAPPoc-A while for Occupancy Management it is GAPPoc-B.
As an example, we choose the occupancy management application.
In the README file, we can see several prerequisites. You have to use GAPPOC-B if you wish to run it on a real board with a real infrared sensor and you would need to download the shutterless library to test it.

In this project, you can see different utilities:
- For example, you have a code to run an Android Application
- You also have an example of a 3D case designed for the GAPPoc-B board.
- Finally, you have dataset tools for converting and collecting images.
We go back to our Linux shell to the occupancy management application and start downloading shutterless library.
When you download the library, please follow the registration process and enter your contact details.

What we are interested in here is the GAP8 project. So, we go into the GAP8 project and click on Makefile where we see default settings:
- For example, it uses HyperRam, which we provide with GAPuino and the first releases of GAPPOC-B. However, you can use QSPI if you wish to make your own board.
- You can use an input file or raw input file, which is a 16-bit image directly from the sensor.
- You can save the output file directly to your PC.
- Again, here you have the “silent” option if you don’t want to show Printfs.
- You can enable the BLE in case you want to stream coordinates of detected people and to run it on a demo


Now we have set all the required parameters. Now let’s go back to the shell and run it by typing:
make clean all run platform=gvsoc
It loads the TFLight and NNtool and we see the model’s conversion and quantization of some sample images. This is executed on the GVSOC simulator.
Here, we see that we have detected three bounding boxes.
We copy this code and paste it into DrawBB.py.
Now we run the script in the shell to see where the bounding boxes in the original images are:
We type:
Python DrawBB.py
Here we have three detected people in the room with three bounding boxes. So you see an example of how an application takes a raw image and processes it using a convolutional NN to determine the bounding boxes surrounding the detected people in the image.

As you can see, NN Menu is a great repository that helps you to build and test your applications.