|
GAP8 Software Development Kit
|
|
GAP8 Software Development Kit
|

GAP8 is a RISC-V and PULP (Parallel Ultra-Low-Power Processing Platform) open-source platform based IoT application processor. It enables cost-effective development, deployment and autonomous operation of intelligent devices that capture, analyze, classify and act on the fusion of rich data sources such as images, sounds or vibrations. In particular, GAP8 is uniquely optimized to execute a large spectrum of image and audio algorithms including convolutional neural network inference with extreme energy efficiency. This allows industrial and consumer product manufacturers to integrate artificial intelligence and advanced classification into new classes of wireless edge devices for IoT applications including image recognition, counting people and objects, machine health monitoring, home security, speech recognition, consumer robotics and smart toys.
GAP8's hierarchical, demand-driven architecture enables ultra-low-power operation by combining:
All cores and peripherals are power switchable and voltage and frequency adjustable on demand. DC/DC regulators and clock generators with ultra fast reconfiguration times are integrated. This allows GAP8 to adapt extremely quickly to the processing/energy requirements of a running application. All elements share access to a L2 memory area. The cluster cores and HWCE share access to a L1 memory area and instruction cache. Multiple DMA units allow autonomous, fast, low power transfers between memory areas. A memory protection unit is included to allow secured execution of applications on GAP8.
All 9 cores share the same extended RISC-V instruction set architecture. The I (integer), C (compressed instruction), M (Multiplication and division) extensions and a portion of the supervisor ISA subsets are supported. These are extended with specific instructions to optimize the algorithms that GAP8 is targeted at. These extensions include zero overhead hardware loops, pointer post/pre modified memory accesses, instructions mixing control flow with computation (min, max, etc), multiply/subtract and accumulate, vector operations, fixed point operations, bit manipulation and dot product. All of these instruction extensions are optimized by the compiler or can be used 'by hand'.
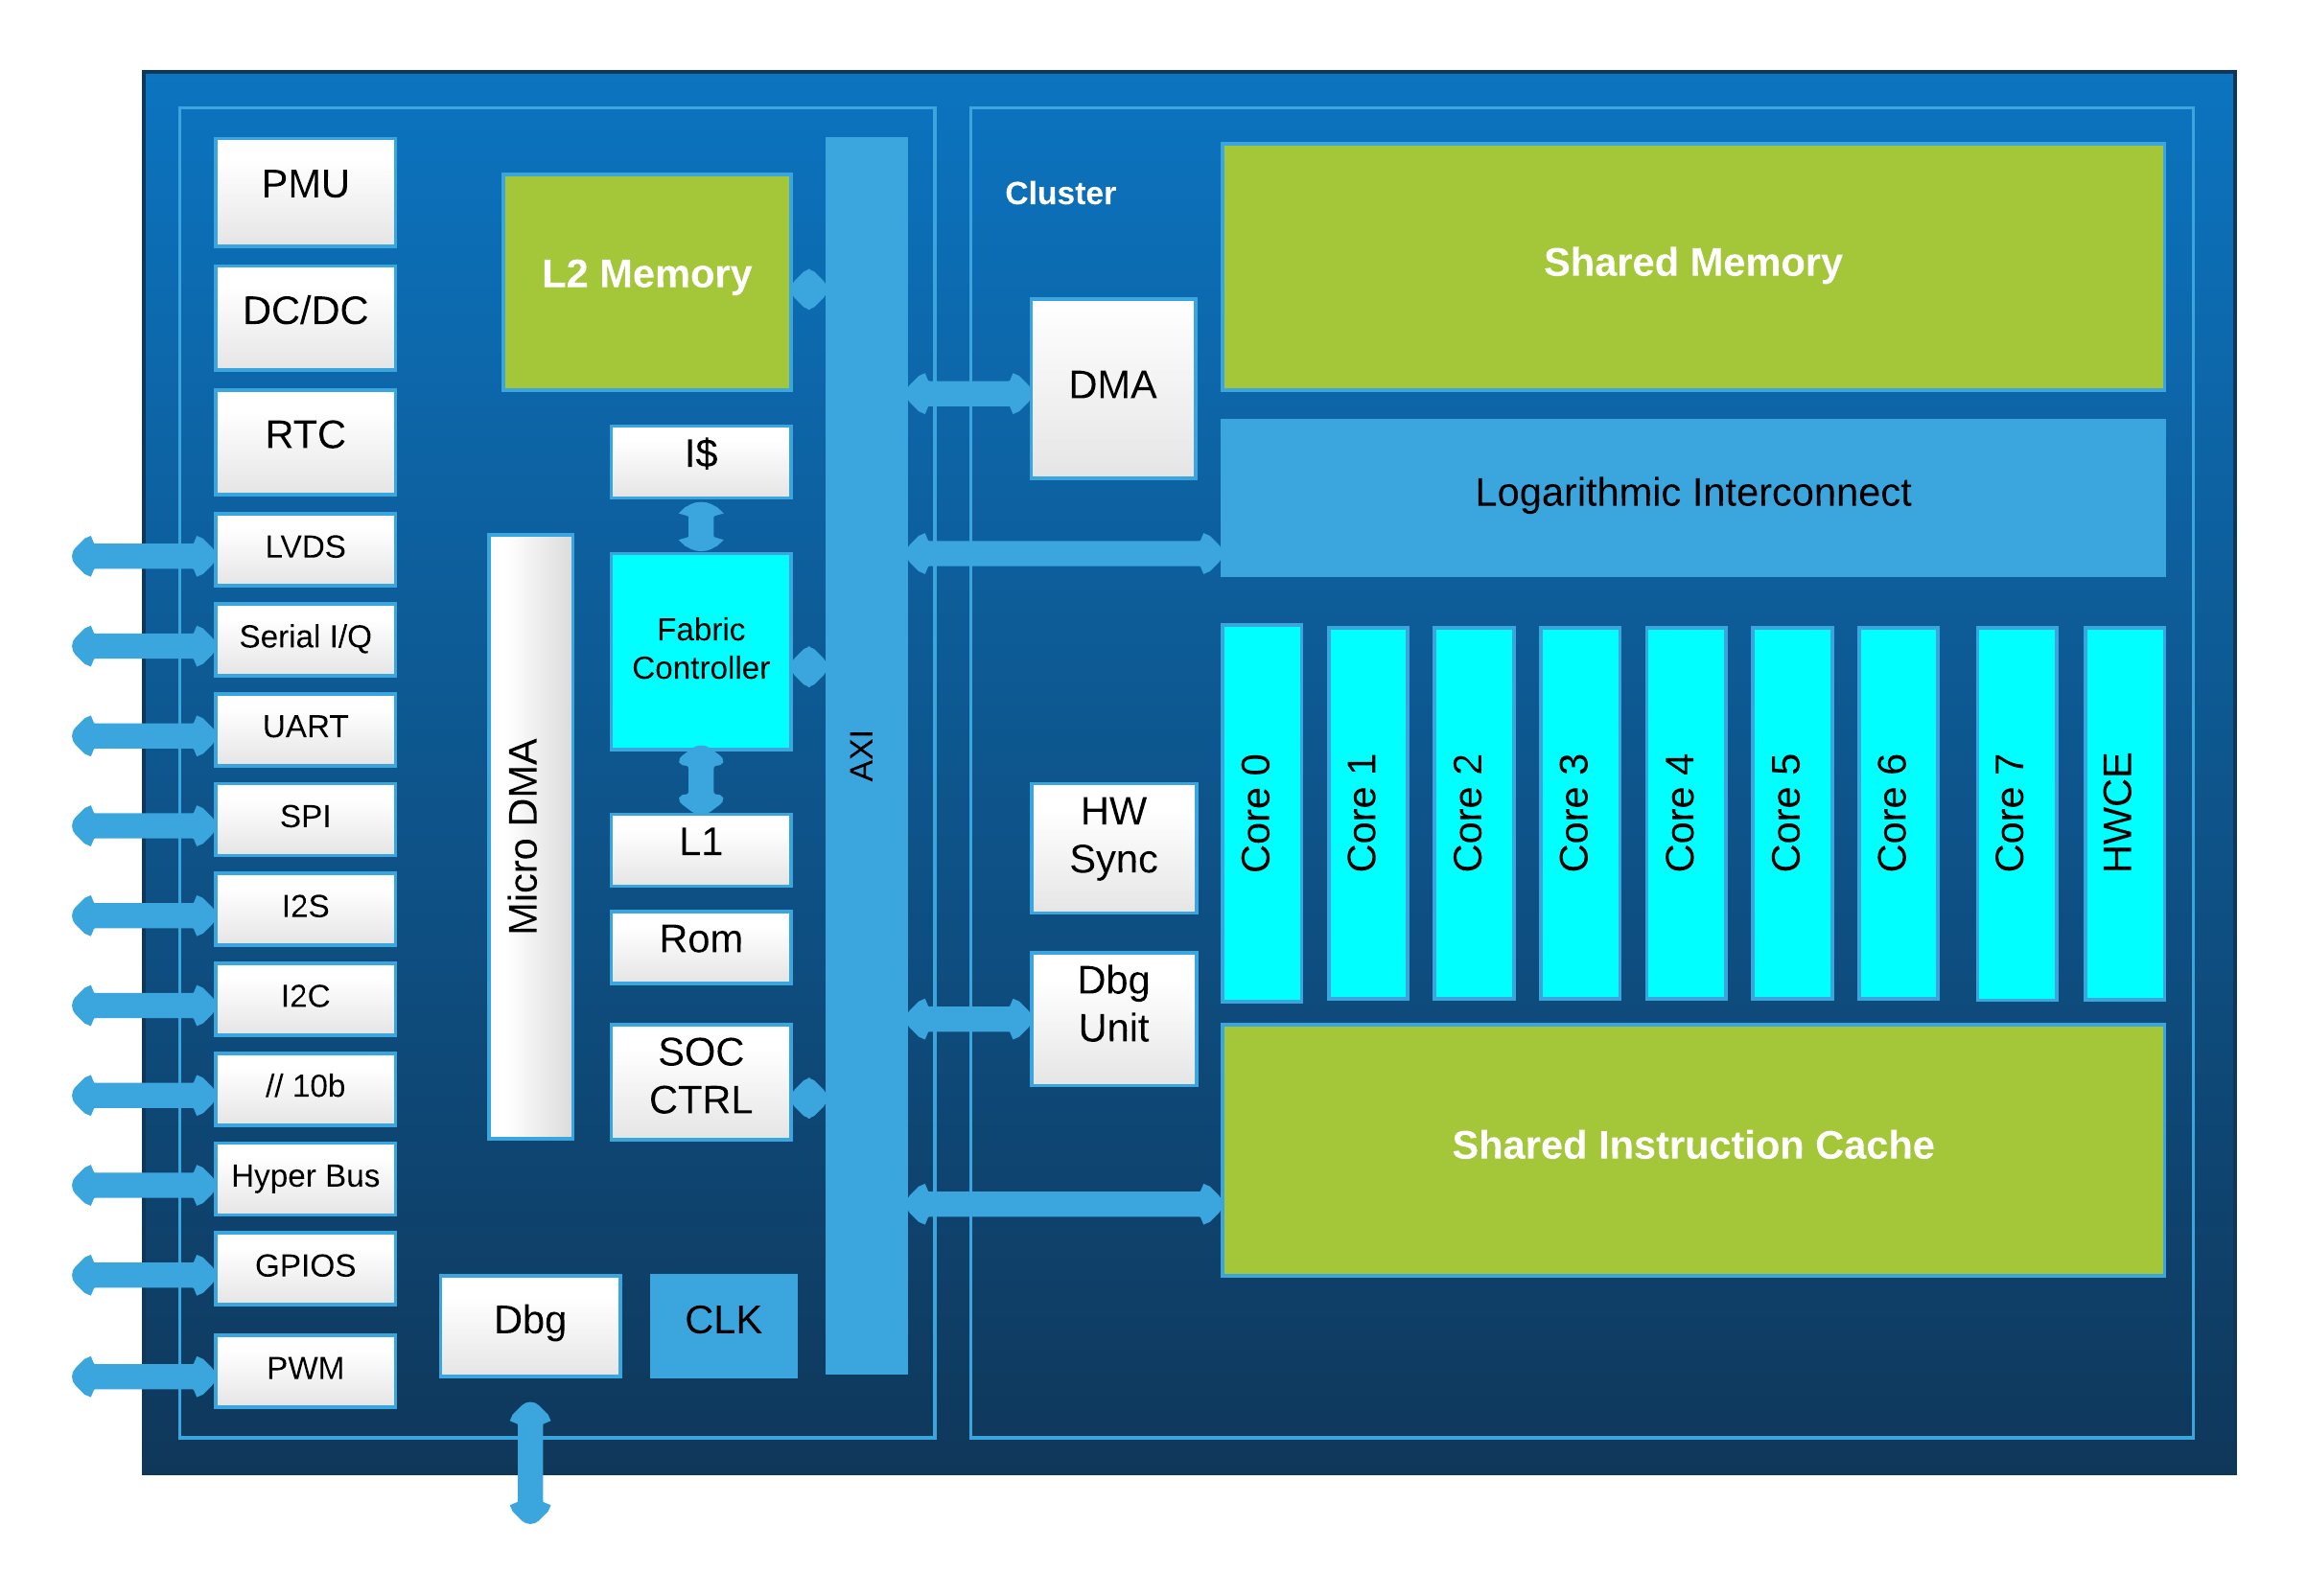
As shown in the GAP8 block diagram above, GAP8 has a rich set of I/O interfaces, which includes:
| Interface | Number | Description |
|---|---|---|
| LVDS | 1 | A 128 Mb/s interface for RF |
| ORCA | 1 | A low debit interface for RF. |
| I2C | 2 | Standard I2C interfaces. |
| I2S | 2 | Standard I2S interface for connecting digital audio devices. |
| CPI | 1 | A parallel interface for connecting camera |
| HyperBus | 1 | A high speed memory bus interface |
| SPI-M | 2 | A quad SPI-M and an additional SPI-M |
| SPI-S | 1 | A SPI Slave |
| UART | 1 | A standard UART interface |
| GPIOs | 32 | General Purpose Input Output |
Other peripherals:
| Peripherals | Number | Description |
|---|---|---|
| RTC | 1 | 32K real-time clock |
| PWM | 4 | PWMs, 12 Output channels |
As mentioned in previous section, GAP8 has 8+1 high performance cores, which play two different roles. The cluster contains 8 cores that can execute in parallel, and provide high performance calculation for image processing, audio processing or signal modulation, etc. The single core, referred to as the “Fabric Controller” or "FC", is used as micro-controller. It is in charge of controlling all the operations of GAP8, like the micro-DMA to capture 1 image from the CPI interface, starting up the cluster and dispatching a job to it, etc. You can think of the cluster as a 'peripheral' of the FC.
Cores are identified using two identification numbers. The cluster ID which identifies the group of cores that the core belongs to and the core ID which identifies the core in that group. The IDs can be used to start a particular task on a core.
| ENTITY | CLUSTER ID | CORE ID |
|---|---|---|
| CORE0 | 0x00 | 0x00 |
| CORE1 | 0x00 | 0x01 |
| CORE2 | 0x00 | 0x02 |
| CORE3 | 0x00 | 0x03 |
| CORE4 | 0x00 | 0x04 |
| CORE5 | 0x00 | 0x05 |
| CORE6 | 0x00 | 0x06 |
| CORE7 | 0x00 | 0x07 |
| FC | 0x20 | 0x00 |
The table above shows:
By default, the cluster is powered down and cannot be used. It must first be powered-up by the FC. Once the cluster is awake, its core 0 plays the role of "master". Core 0 is in charge of the following jobs:
Before receiving a task from the core 0, the rest of the cores stay at a dispatch barrier which clock gates them (i.e. they are stopped and use only a low leakage current).
When a task/application is finished on the cluster, it should be shut down to save power. IT IS IMPORTANT TO MOVE DATA IN THE SHARED L1 MEMORY TO THE L2 MEMORY BEFORE YOU SHUTDOWN THE CLUSTER.
There are 2 different levels of memory internal to GAP8. A larger level 2 area of 512KB which is accessible by all processors and DMA units and two smaller level 1 areas, one for the FC (16KB) and one shared by all the cluster cores (64KB). The shared level 1 memory is banked and cluster cores can usually access their bank in a single cycle. GAP8 can also access external memory areas over the HyperBus (Flash or RAM) or quad-SPI (Flash) peripherals. We refer to RAM accessed over the HyperBus interface as level 3 memory. Since the energy cost and performance cost of accessing external RAM over the HyperBus is very high compared to the internal memory generally this should be avoided as much as possible. Code is generally located in the L2 memory area. The instruction caches of the FC (4KB) and cluster (16KB) will automatically cache instructions as needed. The cluster instruction cache is shared between all the cores in the cluster. Generally the cluster cores will be executing the same area of code on different data so the shared cluster instruction cache exploits this to reduce memory accesses for loading instructions.
To reduce power consumption GAP8 does not include data caches in its memory hierarchy. Instead GAP8 uses autonomous DMA units that can be used to transfer data to and from peripherals and in between internal memory areas.
Good management of memory is absolutely crucial to extracting the most energy efficiency from GAP8. GreenWaves supplies a tool, the GAP8 auto-tiler, which can significantly aid in managing memory transfers between the different memory areas.
The micro-DMA unit is used to transfer data to and from peripherals including level 3 memory. At the end of a transaction the FC can be woken up to queue a new task. To allow the micro-DMA to continue working at the end of a transaction up to 2 transfers can be queued for each peripheral. The micro-DMA schedules active transfers based on signals from the peripherals in a round-robin fashion. Generally the micro-DMA is not used directly by a programmer. It is used by the drivers for each of the peripherals.
As the micro-DMA, the cluster-DMA is a smart, lightweight and completely autonomous unit. It is used to transfer data between the L2 and L1 memory areas. It supports both 1D and 2D transfers and can queue up to 16 requests. The commands for the cluster-DMA unit are extremely short which minimizes SW overhead and avoids instruction cache pollution. \newpage
The GAP8 SDK allows you to compile and execute applications on the GAP8 IoT Application Processor. This SDK is an extract of the necessary elements from the pulp-sdk (https://github.com/pulp-platform/pulp-sdk) produced by the PULP project, to provide a development environment for the GAP8 series processors.
We provide you with a set of tool and two different operating systems for GAP8:
\newpage
These instructions were developed using a fresh Ubuntu 18.04 Bionic Beaver 64-Bit virtual machine from https://www.osboxes.org/ubuntu/#ubuntu-1804-info
The following packages needed to be installed:
An openocd build for gap8 should be cloned and installed:
Now, add your user to dialout group.
Finally, logout of your session and log back in.
If you are using a Virtual Machine make sure that you give control of the FTDI device to your virtual machine. Plug the GAPuino into your USB port and then allow the virtual machine to access it. For example, for VirtualBox go to Devices->USB and select the device.
Please also make sure that your Virtual Machine USB emulation matches your PC USB version. A mismatch causes the USB interface to be very slow.
The following instructions assume that you install the GAP SDK into your home directory. If you want to put it somewhere else then please modify them accordingly.
You can follow the steps for Ubuntu 18.04 except for the following instructions.
After you have installed the system packages with apt-get, you need to also create this symbolic link:
Also, you may need to install git lfs
Now clone the GAP8 SDK and the GAP8/RISC-V toolchain:
In case you use an old git version, you may need to use these commands instead:
Install the toolchain (this may require to launch the script through sudo):
Finally, clone the sdk (adapt gap_sdk path according to your needs)
You can either source sourceme.sh in the root sdk folder and then select the right board from the list, or directly source the board config.
or
If you directly source the board config, you need to source the appropriate config file for the board that you have. The SDK supports 2 boards (gapuino and gapoc) and each of them can use version 1 or version 2 of the GAP8 chip. Boards bought before 10/2019 contains GAP8 version 1 and use a USB B plug for JTAG while the ones bought after contains version 2 and use a USB micro B for JTAG.
Hereafter you can find a summary of the available boards and their configuration file.
| Board | Chip | Config file |
|---|---|---|
| Gapuino | GAP8 v1 | configs/gapuino.sh |
| Gapuino | GAP8 v2 | configs/gapuino_v2.sh |
| Gapoc | GAP8 v1 | configs/gapoc_a.sh |
| Gapoc | GAP8 v2 | configs/gapoc_a_v2.sh |
Once the proper config file is sourced, you can proceed with the SDK build.
Note that after the SDK has been built, you can source another board config file to change the board configuration, in case you want to use a different board. In this case the SDK will have to be built again. As soon as the SDK has been built once for a board configuration, it does not need to be built again for this configuration, unless the SDK is cleaned.
We will first make a minimal install to check whether previous steps were successful. If you are only doing board bringup or peripheral testing, this install will also be a sufficient.
Our modules (gapy runner) require a few additional Python packages that you can install with this command from Gap SDK root folder:
Initialize and download all sub projects required to run pmsis_examples on a board (freertos, pmsis_api, gapy and bsp):
First, use the following command to configure the shell environment correctly for the GAP SDK. It must be done for each terminal session**:
Tip: You can add an "alias" command as follows in your .bashrc file:
Typing GAP_SDK will now change to the gap_sdk directory and execute the source command.
Then, compile the minimal set of dependencies to run examples:
Finally try a test project. First connect your GAPuino to your PCs USB port. Now, you should be able to run your first helloworld on the board.
In details: PMSIS_OS allows us to choose an OS (freertos/pulpos), platform allows to choose the runner (board/gvsoc) and io choose the default output for printf (host/uart).
After the build you should see an output resembling:
If this fails, ensure that you followed previous steps correctly (openocd install, udev rules). If libusb fails with a permission error, you might need to reboot to apply all changes.
If you need Gap tools for neural networks (nntool) or the Autotiler, please follow the next section
If you just wish to also have access to pulp-os simply type:
And replace PMSIS_OS=freertos by PMSIS_OS=pulpos on your run command line.
In order to use the Gap tools for neural networks (nntool), we strongly encourage to install the Anaconda distribution ( Python3 ). You can find more information here: https://www.anaconda.com/.
Note that this is needed only if you want to use nntool, you can skip this step otherwise. Once Anaconda is installed, you need to activate it and install python modules for this tool with this command:
Finally, we install the full tool suite of the sdk (including nntool and autotiler).
Note that if you only need autotiler (and not nntool) you can instead use:
OpenOCD for Gap8 is now used instead of plpbridge. There are a few applications which require OpenOCD, as they are using OpenOCD semi-hosting to transfer files with the workstation.
You have to install the system dependencies required by OpenOCD that you can find here: http://openocd.org/doc-release/README
There are different cables setup by default for each board. In case you want to use a different cable, you can define this environment variable:
If you only followed Minimal installation process, begin by compiling gvsoc:
You can also run this example on the Gap virtual platform with this command:
You can also generate VCD traces to see more details about the execution:
You should see a message from the platform telling how to open the profiler.
As soon as at least one file for a file-system is specified, the command "make all" will also build a flash image containing the file systems and upload it to the flash.
For example, you can include files for the readfs file-system with these flags in your Makefile:
In case you don't have any file but you still want to upload the flash image, for example for booting from flash, you can execute after you compiled your application:
In case you specified files, the command "make all" will not only build the application but also build the flash image and upload it to the flash. In case you just want to build your application, you can do:
Then after that if you want to produce the flash image and upload it, you can do:
The board is by default configured to boot through JTAG. If you want to boot from flash, you need to first program a few efuses to tell the ROM to boot from flash. Be careful that this is a permanent operation, even though it will still be possible to boot from JTAG. This will just always boot from flash when you power-up the board or reset it. To program the efuses, execute the following command and follow the instructions:
If you choose to boot your application from Flash, and you want to view the output of printf's in your code then you can first compile your application with the printf redirected on the UART with this command:
You can also use a terminal program, like "cutecom":
Then please configure your terminal program to use /dev/ttyUSB1 with a 115200 baud rate, 8 data bits and 1 stop bit.
Build the documentation:
If you haven't download and install the autotiler, you will probably have some warnings when you build the docs. All the documentations are available on our website: https://greenwaves-technologies.com/en/sdk/
You can read the documentation by opening gap_doc.html in the docs folder in your browser:
If you would like PDF versions of the reference manuals you can do:
If you want to upgrade/downgrade your SDK to a new/old version:
Please check our release tags here to ensure the version: https://github.com/GreenWaves-Technologies/gap_sdk/releases
This folder contains all the files of the GAP8 SDK, the following table illustrate all the key files and folders:
| Name | Descriptions |
|---|---|
| docs | Runtime API, auto-tiler and example application documentation |
| pulp-os | a simple, PULP Runtime based, open source operating system for GAP8. |
| sourceme.sh | A script for configuring the GAP SDK environment |
| examples | Examples of runtime API usage |
| tools | All the tools necessary for supporting the GAP8 usage |

